安装 comments 应用
-
编辑 settings 文件,
INSTALLED_APPS项添加'django.contrib.comments',:INSTALLED_APPS = ( # ... 'django.contrib.comments', # ... )
-
执行
python manage.py syncdb创建评论表。 - 编辑 urls.py 文件,添加评论相关的 url:
urlpatterns = patterns('',
    # ...
    url(r'^comments/', include('django.contrib.comments.urls')),
    # ...
)
示例 views
def display_topic(request, topic_id):
    topic = Topic.objects.get(id=topic_id)
    return render_to_response('topic.html', {'topic': topic},
                              RequestContext(request))
基本使用
首先要导入 comments 模板标签:
{% load comments %}
模板标签的使用(基于上面的 views):
获取评论数
获取 topic 对象的评论数:
{% get_comment_count for topic as comment_count %}
<p>Comments({{ comment_count }}):</p>
显示评论:
-
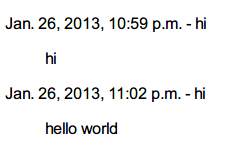
使用默认的显示方式:
{% render_comment_list for topic %}
效果:
-
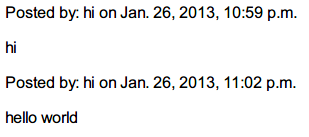
自定义显示:
{% get_comment_list for topic as comment_list %}
{% for comment in comment_list %}
  <p>Posted by: {{ comment.user_name }} on {{ comment.submit_date }}</p>
  <p>{{ comment.comment }}</p>
{% endfor %}
效果:
评论链接
要使用自带的评论链接功能需要在 models 中定义 get_absolute_url 方法(请参考 get_absolute_url):
urls.py:
url(r'^topic/(?P<topic_id>\d+)/$', 'hello.views.display_topic',
    name="display_topic"),
models.py:
class Topic(models.Model):
    title = models.CharField(max_length=200)
    content = models.TextField()

    @models.permalink
    def get_absolute_url(self):
        return ('display_topic', (), {'topic_id': self.id})
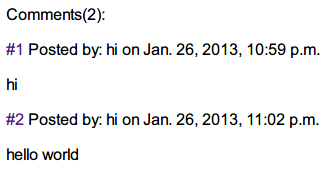
模板中显示评论链接:
{% for comment in comment_list %}

  <p>
  {# 显示评论链接 #}
  <a name="c{{ comment.id }}"></a>
  <a href="{% get_comment_permalink comment %}">
      #{{ forloop.counter }}
  </a>
  {# end #}

  Posted by: {{ comment.user_name }} on {{ comment.submit_date }}</p>
  <p>{{ comment.comment }}</p>
{% endfor %}
效果:
用于发表评论的表单
默认显示方式:
{% get_comment_form for topic as form %}
<form action="{% comment_form_target %}" method="post">
  {% csrf_token %}
  {{ form.as_p }}
  <input type="submit" value="Comment" />
</form>
效果:
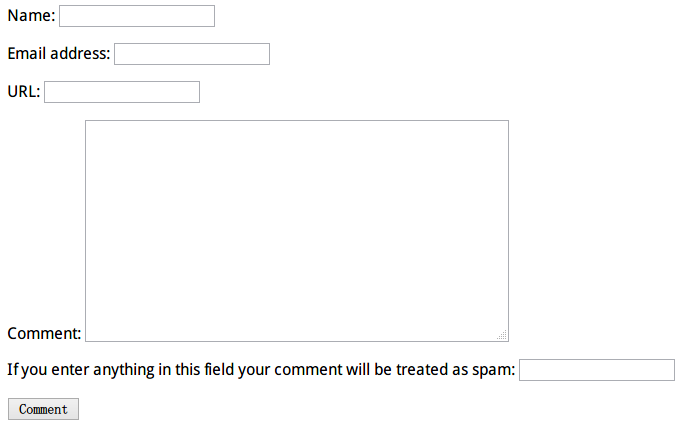
comments form 包含如下字段:
- name ——名称
- email ——邮箱
- url ——网址
- comment ——内容
- honeypot ——防止机器乱填垃圾信息
- content_type ——与后台有关,可以去后台 Comments 应用中看看
- object_pk ——对应的帖子 id
- timestamp ——时间戳
- security_hash ——用于安全检测
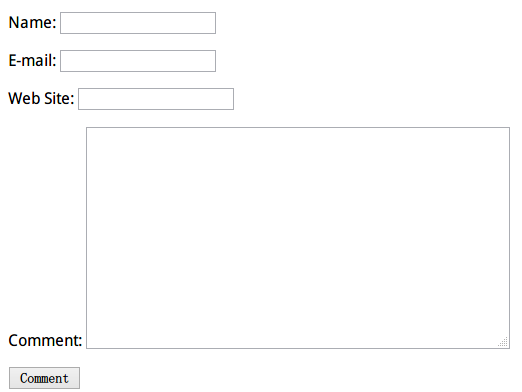
自定义显示
由于默认生成的表单一般让人不太满意,所以就需要通过自定义来调整一下:
{% get_comment_form for topic as form %}
<form action="{% comment_form_target %}" method="post">
  {% csrf_token %}

  <p><label for="id_name">Name: </label>{{ form.name }}</p>
  <p><label for="id_email">E-mail: </label>{{ form.email }}</p>
  <p><label for="id_url">Web Site: </label>{{ form.url }}</p>
  <p><label for="id_comment">Comment: </label>{{ form.comment }}</p>
  {{ form.content_type }}
  {{ form.object_pk }}
  {{ form.timestamp }}
  {{ form.security_hash }}
  <span style="display: none;">{{ form.honeypot }}</span>

  <input type="submit" value="Comment" />
</form>
效果:
评论发表成功后跳转回当前页面
只需在 form 中包含字段 "next" 即可:
<input type="hidden" name="next" value="/topic/{{ topic.id }}"/>
<input type="submit" value="Comment" />
基于 django 1.4.3 的示例项目:仓库 && 下载 。
Comments